Thursday, September 29, 2011

A Must Try for Chocolate Banana Enthusiasts...

Apparently, I now count myself as a chocolate banana enthusiast.  Never thought I was before, but anything chocolately/bananay lately has been on my mind.  Why have I NEVER tried this before?!?!  I have no idea.  But decided it was a good decision.  So yesterday, I got these...
That's right, Hershey's Special Dark chocolate chips.  It should just say "Sarah's Heaven in a bag".  
Mixed in 1/2 a bag with this recipe - and I added about an extra cup of extra ripe bananas as well...

Folded in the chips until just mixed...

Baked...


And ate WAY too much with a cold glass of milk.  Heavenly.  Seriously, why didn't I try this sooner??

Sunday, September 25, 2011

Tollhouse Chocolate Chip Cookies

I'm going to get on a soapbox here for a moment.  I got this recipe off the back of the chocolate chips bag.  It took me less than 15 minutes to make the batter.  It took me less than 5 minutes to get them on the baking sheet.  It took about 9 minutes to bake.  They were about ONE MILLION times better than any slice & bake/refrigerated cookie dough - I promise!!!  I know that slice & bake cookie dough seems so easy and yummy but stop the madness, friends!!  Make them from scratch!!  So. much. better!!  Okay, I'm off my soapbox now, back to cooking...
For these, you'll need:
  • 2 1/4 cups all purpose flour
  • 1 tsp baking soda
  • 1 tsp salt
  • 2 sticks (1 cup) butter, softened
  • 3/4 cup granulated sugar
  • 3/4 cup packed brown sugar
  • 1 tsp vanilla extract
  • 2 eggs
  • 12 oz pkg Nestle Toll House Semi Sweet Chocolate Chips
  • 1 cup chopped nuts, optional


Combine flour, baking soda and salt in small bowl.

Beat butter, granulated sugar, brown sugar, and vanilla in large bowl until creamy.  I just mixed this with spoons instead of a mixer.  I got my butter out a little beforehand to let it soften a bit so it was easy to mix.  It worked out fine.  Add eggs, beating well after each addition.

Gradually add flour mixture until well mixed.  Stir in chocolate chips and nuts, if desired.

Drop by rounded teaspoon onto ungreased baking sheet (I used parchment paper).  Bake 9-11 minutes at 375, or until golden brown.

Cool on baking sheets for 2 minutes, then move to wire racks.

Then see if you can set a personal best for how many cookies you can inhale in one sitting.  I'll share with y'all my personal best another day.  But they're that good, I assure you!  Enjoy!!

Thursday, September 22, 2011

My Favorite Tortilla Soup

I started making this tortilla soup when we first got married.  It started from some recipe I found in a magazine and evolved over the years.  All members of the family will eat it so that's always good around here.  My husband is not super enthused about soups, but this is one that he eats without complaining.  In fact, he was just warning our son this morning that the arrival of fall would be Mommy putting more soups on the menu - then he asked me what was for dinner - haha!!  It's the first day of fall so Tortilla Soup, of course!  Viva la fall and viva la soup!!
For this soup, you'll need:
  • 2 cups cooked chicken (chopped - you could use rotisserie chicken for this - I baked several chicken breasts in the oven with olive oil, season salt, pepper, and garlic powder)
  • 2 tbs olive oil
  • 1 can MILD chopped green chiles, drained
  • 1 can petite diced tomatoes (usually I use 14.5 oz can, but only had the 28 oz can today, so I halved it bc the Mister isn't crazy about so many tomatoes :)
  • 2 cans Mexicorn, drained
  • 1 can black beans (drained, but not rinsed - but if you'd rather rinse, then rinse away)
  • 1 can tomato paste
  • 4 cans chicken broth
  • 1 green pepper, seeded, diced
  • 1/2 onion, finely chopped
  • 2 cloves garlic
  • 1 tbs chili pepper (use less if you like, we like chili pepper around here)
  • pepper, to taste

Saute green pepper, onion, and garlic in olive oil

Add chicken and one can of chicken broth.  I like to add the chicken at the beginning because I feel like the chicken gets some of the extra flavor from the onions and pepper.  Heat through.

The rest of it is just easy!  Welcome to my nerdy cooking self who thinks pictures like this are fun.  Add black beans, corn, tomatoes.

Add chiles and the other can of corn - isn't it pretty?

Then get out this.  This makes the soup a much prettier color to balance the grayish look that the black beans bring to the soup.   Add to tomato paste and remainder of chicken broth.

Mix together.  Here's what it looked like before I brought it to a boil.  Bring it to a boil, cover, reduce heat and simmer until ready to serve.  I think the longer the better on simmering, but it tastes good whether you have 20 minutes or 45...

I didn't get a pic of what it looked like after simmering in the pan, bc I was busy with the last step...
Grating the cheese to top the soup - we had colby jack and pepper jack this time around

Ladle your soup -

Top with cheese and tortilla chips, if desired.  Usually, I also add a little dollop of sour cream and sliced green olives (that may sound weird, but I love green olives on this soup) - we didn't have either of those tonight, but the soup was still fabulous!  Can't wait to eat some tomorrow bc it's even better on day two.  Viva la soup!!

Wednesday, September 21, 2011

Dump Cake

I love this recipe.  So easy, so yummy, and I can't mess it up.  Seriously - a crowd pleaser!  This recipe always makes me think of the midwest.  I don't know if it originated there, but that's what I think of when I make it.  My friend tried it with blueberry pie filling and it worked as well!  I've never tried it with anything besides cherry - I just don't like change!  But I love this recipe.  My husband loves it, too, and he likes it with Blue Bell Homemade Vanilla.  I like it warm out of the oven, but I especially like it cold out of the refrigerator the next day (like for breakfast - shhhhh, don't tell anyone that) - try it and you'll become a believer!
All you need for this cake is:
  • yellow cake mix (any kind)
  • cherry pie filling
  • crushed pineapple
  • two sticks melted butter


Dump pineapple into 11x17 glass baking pan


Spread cherry pie filling evenly over pineapple - don't you love the colors?

Dump cake mix over top and spread around evenly

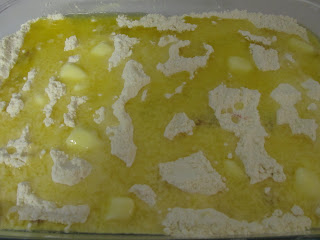
Melt butter in microwave and pour evenly over top of cake.  Seriously, that's it!  Now into the oven!

Bake at 350 for about 30 minutes, or until cake is golden brown on top.

I wish you could smell it through the screen.  So good!!

Yes, it is amazing.  Yes, you must try it!
Enjoy!

**Also, we are now on Facebook!  Search for Cowtown Cooking and you can "like" our page - hope to see you there!

Monday, September 19, 2011

Sinfully Awesome Mashed Potatoes

Oh my heavens, if you're watching what you eat, you need to just skip this recipe.  Don't even look at it.  Seriously, it's not good for you.  At. all.  But it's DELICIOUS!!!  Sinfully Awesome, actually!!  I started from a Twice Baked potato recipe from the same place I got this , decided I wanted to make mashed potatoes instead of individual, and referred to my favorite red & white Better Homes & Gardens cookbook, and voila!  Sinfully Awesome Mashed Potatoes!!  A must try!!  But only if you love cheese, butter, sour cream, and bacon!!
For this you'll need:
  • 8 medium russet potatoes
  • 1/2 cup butter, cut into slices (you could probably use a bit less butter, like 1/4 cup :)
  • 1 cup sour cream
  • 3 bacon slices, cooked and crumbled
  • 1/2 cup milk
  • 1/2 tsp seasoned salt
  • 1/2 tsp pepper
  • 2 cups grated sharp Cheddar Cheese
  • 2 green onions, sliced


Start by peeling and slicing the potatoes.  I then put them in boiling salted water for 20 minutes.  While they are cooking, I got started on the rest it...

Cook the bacon till brown and crispy.  Drain on paper towel.

Combine butter, sour cream, milk, bacon, green onions, 1/2 cup cheese, seasoned salt and pepper.  Mix and put in refrigerator until potatoes are ready.

After potatoes are drained, season with additional seasoned salt and pepper to taste.

I was going to use a mixer to whip my potatoes, but decided that I really just like mine kind of lumpy so I just used a large fork to mash.  It worked well and was super easy.

Then mix potatoes with butter mixture

Put in greased dish.  Top with cheese (I used about 1 cup of cheese, but you may want to use more :)  Bake in 350 degree oven for 15-20 minutes or until sides are bubbly and cheese is melted.

Looks pretty good when it comes out!

And AMAZING on your plate!!  Seriously. Amazingly. Yummy.

And we had some with the beef stew from the night before - a perfect compliment!  And, yes, I only ate the beef pieces out of the stew - no squash was had by me :)  But I sure did have a second helping of those potatoes!!

Friday, September 16, 2011

Harvest Beef Stew

I love fall so I was super excited to try this new recipe that just sounds like fall!  A rich, hearty beef stew from the same place I got the yummy baked penne .  Also, I was excited to cook with butternut squash for the first time!  But you'll see how that turned out later - ha.  This recipe was good, but could've been better with a few modifications for our family.  More on that later!  But it was perfect for a welcome to fall & perfect with ...cream biscuits!!  It was also very good with potatoes that I'll post about later - you don't want to miss those!!

The original recipe called for lamb, but this was another option they suggested.  Since beef is easier for this mama to stomach than lamb, we went with the beef version.  My husband said he felt like he was eating dinner in England.  That has to be a good thing, right??
For this stew, you'll need:
  • 2 1/2 lb beef stew meat
  • 1 1/2 tsp salt
  • 1/4 tsp freshly ground pepper
  • 1/4 cup all purpose flour
  • 4 tbsp olive oil
  • 1 6 oz. can tomato paste
  • 1 14.5 oz can beef broth
  • 1 cup chopped celery (about 2 stalks)
  • 1 cup chopped onion
  • 3 garlic cloves, crushed
  • 1 small butternut squash, peeled, seeded, chopped

Rinse meat, pat dry.  Sprinkle with salt and pepper, toss in flour, shake off excess.

Cook half of meat in 2 tbsp hot oil in Dutch Oven until browned.  I don't have a Dutch Oven and thought I'd just use my big pan.  If you have a Dutch Oven, use it!  The yummy brown bits on the bottom would've worked better if I'd had a Dutch Oven :)

Repeat with remaining meat.  Here's what my set up ended up looking like.

I returned all meat to pot, then added tomato paste.  Cook 1 minute.  Add beef broth, stir to loosen particles from bottom of pan (this is where having a Dutch Oven would've come in handy)

Transfer mixture to a 6 qt crockpot.  This is where things were getting crazy in my kitchen.  I know crockpots are supposed to make our life easier, but I'm not sure I'm on board that bandwagon!!  It's just hard for me to get it together early enough to have it cook for X amount of hours.  It's easier for me to just cook dinner right before we eat it.  At this point, I'm throwing stuff in the crockpot at a fever pace, children are screaming, and I'm thinking, "This better be worth it!!"  Sorry, I digress...

Stir in celery, onion, and garlic.

Then came the squash (that's right, it wasn't over yet!!  I think I have issues with this recipe...).  I cut it open and seeded it with a spoon.  This process was easier than peeling the squash.  I wasn't quite sure what the best course of action was to peel it, so I just used the same knife that I chopped it up with.

Butternut Squash went right on top (don't stir in).

Cover and cook on LOW 4 1/2 hours or until meat is tender.

Sidenote:  it was at this point I noticed my hands were burning.  From the squash.  I'm allergic to cantaloupe and this squash had a very similar smell to cantaloupe.  So that was first red flag.  Then once I chopped it up my hands started burning.  Second red flag.  Then I tried some of the stew, had a giant allergy attack.  Had to get out the Benadryl.  Good times.  Next time I plan to use potatoes instead of squash.  But that's just me.  Anywho...

It did look super yummy and fall appropriate - especially with the cream biscuits!  If only I hadn't had the allergy attack it would've been perfect ;)

Wednesday, September 14, 2011

Baked Penne with Italian Sausage Tomato Sauce

I was really happy with how this recipe turned out.  I can't believe I have never cooked with Italian Sausage before!  The Mister loves Italian Sausage on pizza, but it's never been high on my list of favorite foods.  However, I was interested in seeing what it could do with the tomato sauce and I was not disappointed!  This recipe was easy and yummy - perfect combo for this week of getting back into the swing of things.
**Please note that this picture shows tomato paste, but you don't need the paste, only the tomato sauce (I figured this out later on and didn't want to reshoot :)
For this recipe, you'll need:
  • 1/2 lb Italian Sausage
  • 1/2 cup finely chopped onion (ended up being about half of the onion)
  • 2 tsp minced garlic (I used two cloves of fresh garlic)
  • 1 tbsp extra virgin olive oil
  • 1 1/2 tbsp Italian Seasoning Mix (original recipe called for this, I used Italian Seasoning Grinder, see below)
  • 1 (28 oz.) can crushed tomatoes
  • 1 (8 oz) can Spanish style tomato sauce (I used tomato sauce with basil, oregano, and onion)
  • 1 tsp kosher salt
  • 1 tsp honey
  • 1 (16 oz.) package ziti pasta (I couldn't find ziti, so used penne instead ;)
  • 2 cups shredded mozzarella


This recipe came from this magazine - SOOOOO many awesome recipes I can't wait to try!!  Perfect for the fall!!  Back to the recipe...

Cook sausage over medium heat 8-10 minutes or until meat is no longer pink, breaking sausage into pieces (not pretty in the picture, my apologies :)  I added a little oil here so as not to completely burn my sausage. Drain; return sausage to the pan.

Saute onion and garlic in hot oil in saucepan over medium heat 2-3 minutes or until tender.  This part smelled divine!!

Now, you could add 1 1/2 tbsp Italian Season Mix here (1/2 cup dried basil, 2 tbsp plus 2 tsp dried oregano, 4 tsp dried crushed red pepper, 2 tsp whole black peppercorns.  Process in food processor 1 minute or until mixture is fine powder.  Store in airtight container up to 4 months)  OR you can do what I did...


Use this!!  Super easy and on sale at Alberston's this week for $1!!  All the same ingredients, already in a grinder - Score!  (Sorry, sometimes the silliest things get me super excited)  I just used this and seasoned my sauce to taste.  Mix and cook 1 minute.

Stir in crushed tomatoes, tomato sauce, and 1 cup water bring to a boil, stirring constantly.  Reduce heat to low; simmer 40-45 minutes or until slightly thickened.


It was at this point during the process, I realized I should've used a different pan.  Learn from my mistakes, friends, use a bigger pan.  (Becky, this is for you!! :)

After simmering, stir in salt and honey.  Yes, honey!  It sounds weird, but works well.  Then, mix in 1/2 cup mozzarella with drained noodles and sauce.
Put in lightly greased pan, top with remaining mozzarella (original recipe called for 1/2 cup, but we like cheese around here so remaining 1 and 1/2 cups of cheese was used :)

Bake at 350 for 20-25 minutes or until cheese is melted.  Let stand 10 minutes before serving.

Enjoy!  This was enjoyed by all members of the family - easy and yummy!