Monday, October 15, 2012

Nutter Butter Truffles/Oreo Balls

These little gems are a little bite of heaven.  So easy, but so yummy!!  Like cake balls, but easier to make and did I mention easy??  So. easy!  All you need is a food processor and:
  • Oreos (pick your flavor, more on that later) or Nutter Butters - regular size package
  • 8 oz block of cream cheese (room temperature)
  • white or chocolate Almond bark
That's all you need!  And not baking required.  This is a monthly must-have for our bunco nights & I've been having some fun with it lately, trying out new variations.  Regular Oreos (not double stuf) are the easiest, but I've also tried Mint Oreos & I think you could use about 3/4 of the cream cheese block for those bc there is more creme in the cookie.  I recently made the Nutter Butter truffles & they turned out to be everyone's favorite of the three! (My bunco girls are my sample set :)  I made it as you'll see, but I also think for this variation you could use 1/2 a block of cream cheese & about 1/4-1/2 cup of peanut butter & you'd end up with a creamier truffle with more in-your-face peanut butter flavor.  But, as I said, the girls liked the Nutter Butter truffles the best of the 3, so maybe they're perfect just the way they are?  You decide & let me know :)

Here are a few pics of the process below - I'm sad to say I didn't get the finished product - this season of life is too crazy & these were eaten too quickly!  So use your imagination & think yum, yum, yummy!!

Just dump entire package of cookies (oreos or nutter butters) directly into food processor...

pulverize to crumbs are all the same size, then add block of cream cheese...

After thoroughly mixed it will look like this - that's perfect!

Then scoop and shape the balls.  These are all pretty uniform, but if I use a melon baller they are huge, if I make them smaller, there's a million, so just decided what you'd like.  This batch made two of these pictures above, so quite a few & there wasn't enough coating for all of it, so just size them the way you prefer.

After rolling all the balls, put in the refrigerator for about 30 minutes to chill before coating.  You can leave them in longer, but 30 minutes usually works well.  I think for this batch I made the balls one day & dipped them the next, that worked great for the time I had.

Then get out your almond bark - I use CandiQuik because it has it's own tray so the cleanup is super easy.  But I've also tried almond bark brand and I hope to try melting chocolate chips with baking wax sometime soon, but there just wasn't enough time on this day!  I chose regular chocolate for the nutter butter balls, but usually I use white chocolate for the oreo balls.  You could also use contrasting chocolates to make designs on the top of the balls, but I never have time for that & they still taste good! :)

Follow the directions for melting on the package & then you're ready for dipping!  Dip the truffles, letting the excess run off, place on wax paper & back in the fridge to set.  It sets fairly quickly and you're good to go!  So tasty, easy, and great to take to parties.  Such an easy go-to dessert.  Enjoy!!

Monday, August 6, 2012

Lego Head Marshmallow Pops

This little party favor/decoration only has a few ingredients, but it makes a cute end result!  With a little patience, I was able to make these little lego heads for my son's birthday party - they turned out a hit!
All you need are:
  • 1 bag Yellow candy melts
  • 1 bag regular marshmallows
  • 1 bag mini marshmallows
  • lollipop sticks
  • your choice frosting (optional)

I started with my marshmallows.  Originally, I was going to cut the minis in half and stick them to the bigs with frosting, but it's really not necessary bc the minis have their own stickiness when you cut them, and they worked just fine later on.  So I didn't use the frosting, but if you weren't going to cut the minis, I would definitely go with the frosting.

After sticking my minis to the bigs and putting them on the lollipop stick, I put them in my super-fancy lollipop holder (i.e. a Cap'n Crunch box with holes in it that I made from a screwdriver - yay for using what you have!!)

Then it was my nemesis.  The candy melts.  For some reason, I have conquered the Almond Bark, but candy melts still allude me.  They just don't melt to that drippy consistency for me.  I've tried stove & microwave & neither one gets it how I want it.  This time was closer, but still not drippy.  Anywho.  Melt the candy melts and dip the marshmallow pops in the melts.

I then used a knife to smooth the coating around until it looked good (enough) - ha.

Now, several sources online said to use these for the faces.  I tried them and I can't say I loved how it turned out.  So, I bought a sparkle gel writer that gave me better results for what I was looking for.

The only trick with the sparkle gel was to be very careful not to use too much & watch for drips.

They were perfect for the party!

Sunday, August 5, 2012

Must Try Brownie S'mores

Easiest breakthrough ever, Cowtown friends:  make these brownies, put between two graham crackers and ENJOY!!  Seriously, perfect s'more with no campfire & no mess.  If you follow the Cowtown Cooking page on FB, you already saw this breakthrough.  Let me tell you, it's SO good!!  The graham cracker is a perfect compliment to the super sweet brownie.  I didn't know it could get any better.  A must try!!

Saturday, July 28, 2012

Easy Baked Chicken

This is the story of how I turned these 5 ingredients into something wonderful.  Something mouth-wateringly (yes, I just made that word up!) delicious and simple enough to make every week!  I used to be intimidated by the thought of baking a whole chicken, preferring to just buy the rotisserie bird at the store already cooked, but fear not, Cowtown Friends!  This is so simple!  So easy!  And I promise you, tastes fabulously better and you won't go back to the rotisserie standby! (Ok, maybe you will occasionally, but it will only be for extenuating circumstances ha)  But other than that, trust me, for flavor, tenderness, and easiness, this is the way to go!
For this recipe, you'll need:
  • 1 whole chicken (mine are usually about 3-4 lbs, but you can use whatever you like)
  • extra virgin olive oil
  • coarse sea salt
  • onion
  • garlic


First things first, you have to do is clean the bird.  I admit this is my least favorite part.  I hate it.  But I've had to come to terms with it bc it has to be done.  Remove the giblets, rinse the chicken, and pat dry.  Place on cookie sheet lined with foil.  I usually grease mine with olive oil. 

Tie back the legs with string, as seen above.  Season whole chicken with coarse sea salt.  Now, the recipe calls for only rubbing olive oil if bird is smaller than 3 1/2 lbs, but I like to rub the olive oil on anyway.  So I do.

Then you're ready!  Roast chicken in 400 degree oven for about 12 minutes per pound, until thermometer in thigh reaches 165 degrees.  

Now, after 30 minutes of roasting, you're ready to add veggies for the remaining roasting time.  This is easy!  Just have your veggies chopped and ready to go and throw them on the pan, around the bird, after 30 minutes of roasting time.  This time around I just did garlic and onions, but you could use carrots, potatoes, or sweet potatoes & they would all be fabulous!

Remove your chicken from oven & let rest for 10 minutes before slicing.  Doesn't it look yummy??  And look at those onions!!!!  YUMMMMM!  Yes, they have that yummy chicken flavor & they're soft and totally tasty!  Yes, I love onions & these are delightful!  

Hope everyone can try this recipe - we love it bc everyone in our family will eat it, but we can have it one night with some sides (like the amazing smashed potatoes), and then the next night, chop up the remaining chicken for another dish (chicken spaghetti is a regular favorite around here).  It's just so easy and versatile.  Have I said easy enough??  Enjoy!!
Thursday, July 26, 2012

Green Chile Chicken Casserole

Soooo, it's been awhile since I've posted!  Summer has been busy!  Here's an easy favorite that feeds our family these days.  
For this recipe, you'll need:
  • 1 10 oz can green chile enchilada sauce
  • 1 4 oz can green chiles (I usually use MILD, but if you're brave - go for it!)
  • 4 oz block of cream cheese (half of the block)
  • 2 cups (or so) chopped cooked chicken
  • 1 cup shredded cheese (I used colby jack this time, but monterey jack or anything would work, choose what you like)
  • tortilla chips


Mix first 4 ingredients in a pan on stove and heat through.  Sprinkle a layer of crushed tortilla chips in greased pan, top with half of chicken mixture.  Repeat the layers and top with tortilla chips and cheese.  
Bake for 10-15 minutes at 400 degrees or until a nice crust forms on the top - then you'll know it's ready!

Tastes like a yummy enchilada, without so many steps!  Great for weeknight dinner with corn - easy dinner for the family.  Enjoy!

Thursday, May 24, 2012

Amazing Smashed Potatoes

That's right - you read that correctly - smashed potatoes!  I first saw something like this on Pinterest, then I got this recipe from my Everyday Food magazine, tried it, loved it, made it twice in a week!  You may say I'm obsessed with these potatoes.  You may be right.  

It's just that I find them to be the perfect blend of creamy potato goodness with a crunchy outer layer like the perfect french fry - but this one is made with sea salt and olive oil - ingredients you can feel good about!

So trust me, if you like potatoes at all - MAKE THIS RECIPE!!  You'll be glad you did!!
For this recipe you'll need:
  • about 1 1/2 lbs of small potatoes
  • coarse sea salt
  • olive oil


Rinse potatoes well and cut out any bad spots, put in pot of water.  Bring water to boil, then reduce heat and simmer for 15 minutes.

Drain and let stand for 5 minutes

Now, the original recipe called for me to use "the heel of my hand" to press down and smash the potatoes.  Since I don't have a desire to give myself a third degree burn, I used the back of a large spoon.

And I'm happy to report, it worked just fine!  And now serious burns - yay!

I also like that you really can't mess this part up.  Smash them however you want to - mine are a little more on the smashed side, the ones in the original recipe were a little more intact - just see what you come up with and see what you like.

Drizzle generously with olive oil and sprinkle on sea salt to taste.

Put them in a 450 degree oven for 30-35 minutes, turning once halfway through (I recommend using tongs, not your bare hands)

This picture cannot show you how AMAZING these potatoes are!!  So perfectly creamy, crunchy, salty, yummy - SOOOOO good!


Perfect side dish for baked chicken - that recipe coming soon!  Try the potatoes!  You won't regret it!

Saturday, May 12, 2012

Chocolate Saltine Toffee

This is a recipe I got from Pinterest & made for bunco the other night.  And then I ate WAY too much of it the following day.  Be warned:  this stuff is seriously addicting!!!  And sinfully good!!!  And all you need is:
  • saltines
  • 1 cup butter
  • 1 cup brown sugar
  • 12 oz bag semi sweet choc chips (about 2 cups)
And all you have to do is:

Line a greased (with cooking spray), foil lined cookie sheet (or jelly roll pan) with saltines.  I just used as many saltines that fit in my pan.

Then, melt butter and brown sugar in saucepan until sugar is melted and combined.  I really had to watch it bc it will boil, but you don't want it to burn, of course.  It took about 10 minutes and it needs to boil and then reduce to simmer, but you'll know it's done when the granules are gone & it's all mixed together.

Then pour sugar mixture over saltines - the saltines will move (obviously based on the pic :) and that's fine.  Then put in 350 degree oven for 8-10 minutes until toffee is bubbling.

Take out oven and let stand 3-5 minutes before pouring chocolate chips over mixture.  Let stand about 5 minutes more for chocolate chips to melt.

Then spread over mixture.  Here's half and half for you to see :)

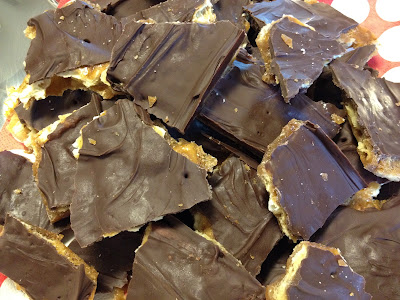
Then I let it cool on the counter bc I wasn't in a hurry, but it took forever so I stuck it in the fridge.  After it was hard enough, I broke it in to pieces and put it on a pretty plate...  after tasting it, of course!  And, oh my word!!!  Easiest, yummiest, going-to-make-my-pants-to-tight delicious!!
Happy Mother's Day, Chocolate Lovers!!

Enjoy!!

Friday, May 11, 2012

Easiest Baby Red Potatoes Ever

I made this into it's own post bc it's just so easy to add this filling, yummy side to any of your meals.  I just got a small back of baby reds at the store, washed them, cut off any brown spots, and put them in boiling salted water for about 15 minutes.  Drain, add butter, season with salt and pepper and voila!
Perfect comfort food to compliment any meal.

SO good!!!

Wednesday, May 9, 2012

Shrimp Linguine

Back to blogging after a bit of an inadvertent cooking break at our house - we had to put our beloved family dog down a few weeks ago & I'll tell you, it hasn't been the same in our kitchen without her!  She used to sit at my feet, just waiting for something to fall for her to gobble up.  I miss her & my floor misses her, too!  I didn't realize how much she helped keep my floor clean until now!  So, it took me awhile to get back to cooking, and took me a few tries to get back to cooking stuff that tastes good, but I believe we're back on the up and up, now that it's been a few weeks & I have a few good meals under my belt.  I decided to cook a few different things since I hadn't cooked in awhile - this is one of our favorites, though we don't eat it often - bc it's so easy, yet looks impressive.
For this recipe, you'll need:
  • your choice linguine noodles
  • extra virgin olive oil
  • 2 lemons
  • butter
  • 6 cloves of garlic
  • 1/2 lb of raw shrimp, peeled and deveined


I'll be honest, this is not my favorite part.  I'd rather pull the giblets out of a chicken, than peel & devein shrimp with their little eyeballs looking at me.  But, in order to eat, we must peel.  So I did.

Make sure you devein the shrimp on both sides by simply slicing down the backside of the shrimp & rinsing out the vein.  It's pretty easy, just kind of labor intensive.

Smash & cut up garlic.  Smells so good!!

Boil linguine according to package directions.  Drain, but reserve about 1 cup of noodle water. Add a few tbs of butter in the noodles to prevent sticking & act as a base for your sauce.  Put aside.

Put a few tbs of olive oil in your warm skillet.  I have an electric range so it's tricky with the temperature.  Make sure it's not too hot or it will cook your shrimp too quickly and make it tough.

I added salt and pepper to my shrimp before adding it to pan.  Cook until shrimp turns pink - about 3-5 minutes.  Add the juice of 1 lemon (be careful for seeds) with the shrimp.

Once the shrimp is cooked, remove from pan.  Add more olive oil, 2 tbs butter, and garlic to the pan. Saute the garlic until cooked through.  Add the remaining juice of the other lemons (this doesn't make the sauce lemony, it just takes the fishy smell out of the shrimp).  Add remaining noodle water (I used about 1/2 cup, but you may use whatever suits you)

When your sauce looks like this, add the shrimp quickly, mix, then pour over linguine.
We ended up with two versions of this dish at our house:

Shrimp linguine, brussel sprouts with butter, red potatoes for the mister.

Shrimp linguine with mushrooms sauteed in garlic and butter, red potatoes, & french bread for me.  Carbs, anyone???

The mister doesn't like mushrooms, I don't like brussel sprouts, makes for more mushrooms for me & more brussel sprouts for him!  Perfect! 

Looks fancy, but super easy, what could be better?

Monday, April 9, 2012

Deviled Eggs & Fluffy Fruit Salad

It's so funny how food brings back memories for me.  For example, these two dishes remind me of dear friends (you know, friends that you had before kiddos, which now seems like a lifetime ago!!) and every time I make them it reminds me of those friends, those events, or those people that I shared that food with.  Isn't it wonderful how food does that?!?  I felt that I needed to share that little extra tidbit with these easy peasy recipes that are great - not only for Easter, but to bring to any event or get together.

These deviled eggs remind me of my dad - who can eat a dozen deviled eggs in one sitting :) - but also of an Easter we spent with several friends, who were all far away from family, and I brought these as a taste of home - such a fun memory!
For the deviled eggs, you'll need:
  • 6 hard cooked eggs
  • 1/4 cup mayonnaise
  • 1 tsp mustard
  • 1 tsp vinegar
  • paprika
I made 2 and a half times the amount of eggs, so I adjusted the above recipe accordingly.  I needed a lot of eggs, my dad & husband & I eat WAY too many of these eggs!! :)

Halve hard cooked eggs lengthwise and remove yolks.  Collect yolks in a bowl & mash with a fork.  Add mayo, mustard, and vinegar, mix well.  Stuff egg whites with mixture.  Sprinkle paprika for a bit of color :)  

Chill in refrigerator until ready to serve.  Then, if you're like me, eat way too many!!  Enjoy!!


  • This next recipe I found several years ago when I was looking for a recipe for fruit salad that didn't have mayo as an ingredient - to take to a friend's house who didn't like mayo.  I found this fruit salad & now every time I make it, it always reminds me of them!  I've also been told that this fruit salad reminds people of the old school pink fruit salad that old ladies used to bring to church events (but in a good, comforting way - haha!).

For the fruit salad, you'll need:
  • 12 oz Cool Whip
  • 21 oz cherry pie filling
  • 8 oz crushed pineapple
  • 11 oz mandarin oranges (drained)
  • 1/2 bag miniature marshmallows
Mix together, chill for at least an hour, and serve.  Easy, easy, easy!!  And yummy, yummy, yummy!!

Feel free to share any recipes that bring back a memory or two in the comments!

Tuesday, April 3, 2012

Cheesy Pasta Primavera

This is yet another recipe from Everyday Food magazine - can you tell where I went for my recipes this particular week!! EF volume 91, thank you!! Ha! I loved this recipe bc it was very much like comfort food, but with all the veggies it kind of felt healthy, too :) I love it, too, bc I strayed away from the original recipe and it was still so yummy. I think you could add whatever you like to suit your tastes & you'll still love it!
For this recipe, you'll need:
  • coarse salt and ground pepper
  • whole wheat fusili or other short twisted pasta (I really wanted to try wheat pasta, but I only had regular fusili on hand, but I will be trying the wheat at some point)
  • 3 tbs butter
  • 1 onion (I used sweet)
  • 1/4 cup all purpose flour (spooned & leveled)
  • 2 1/2 cups whole milk
  • 2 zucchini or yellow squash (I used yellow squash), cut into 1/4 inch half moons
  • 1 cup cherry tomatoes, halved
  • 1/4 grated parmesan, plus more for serving
  • 1/3 cup fresh basil leaves (I didn't have any of these, therefore didn't use them :)


In a large pot of boiling salted water, cook pasta according to package directions. Drain pasta, but reserve 1 cup pasta water for later in the recipe...
Melt butter over medium-high heat. Add onions & cook until translucent. This is where I threw in some mushrooms I had to add more flavor to the sauce (And I cut them big enough for the hubby to pick out, since he doesn't like mushrooms, but is okay with using them in sauces :)

Add flour and whisk to combine

Add milk and cook, whisking frequently, until simmering and thickened, about 10 minutes - doesn't that look yummy??? Season with salt and pepper (and garlic powder if you'd like, just sayin').

Add yellow squash and cook until crisp-tender, about 6-8 minutes.

Stir in pasta, parmesan, and tomatoes (I saved the tomatoes for later bc hubby doesn't like tomatoes & I put them on the side so he wouldn't have to pick them out :). At this point, I used the remaining pasta water to make the sauce the right consistency (I didn't use the full cup bc I like sauce on the thicker side).

Here's my bowl! I added the tomatoes, mixed it up, and added the avocado on top since I had one in the fridge - isn't it pretty?? And it tasted so fresh and yummy! The avocado added a nice buttery addition to the pasta - to go with the butter & cream already in the dish :) Enjoy!