Monday, October 31, 2011

Brown Sugar Blueberry Breakfast Bread

Say that 5 times fast, my friends!  I was inspired to make this bc my child LOVES blueberries and anything blueberry related.  I love making quick breads and I thought this just sounded good.  I started with a basic muffin recipe from my trusty Betty Crocker red and white cookbook, but then I took a little  of this and a little of that, and this is what came out of it!  I guess we call it a happy accident?  Because it got rave reviews from the family!
For the bread, you'll need:
  • 12 oz frozen blueberries
  • 1/3 cup packed brown sugar
  • 2 1/2 c. flour
  • 2/3 sugar
  • 4 tsp baking powder
  • 1/2 tsp salt
  • 1 tsp cinnamon
  • 1 1/2 cup milk
  • 1/2 cup oil
  • 2 beaten eggs
For topping, you'll need:
  • 1/2 cup butter
  • 1/2 cup sugar
  • 1/2 cup flour
  • 1/4 cup lightly packed brown sugar


I started by putting my blueberries in a bowl and mixing it with brown sugar.  The blueberries were frozen so I just thought it would be good if they got to know the brown sugar before I mixed them into the batter.  Also, if you're using frozen blueberries, make sure you remove all stems as the bag I used had several blueberries with stems still attached!  I figured nothing would ruin my bread like a bunch of random blueberry stems.

In a medium bowl, mix together flour, sugar, baking powder, salt, and cinnamon.  Make well in center of flour mixture and set aside.  In another small bowl, mix together milk, oil, and eggs.  Pour milk mixture into flour well.

Mix flour mixture until just moistened.

Add blueberry/brown sugar to batter

Mix until just mixed as well.  I thought it would be good to have ribbons of brown sugar running through the bread.  the more brown sugar = the better the bread.

Then for the topping!  You don't have to add the topping, but it really makes this a sweet breakfast treat!  Yum, yum, yummy!  Just mix the flour, sugars, and butter in a small bowl.

Cut with pastry blender until it is well mixed.


Here's where the great brown sugar blueberry bread experiment really began.  I can't bake muffins in my oven bc my muffin pan is too big for my oven (crazy, right?).  Soooo, I use my trusty cupcake baker which is a great alternative.  However, for the topping on these muffins,  I'll be honest, I wasn't completely satisfied.

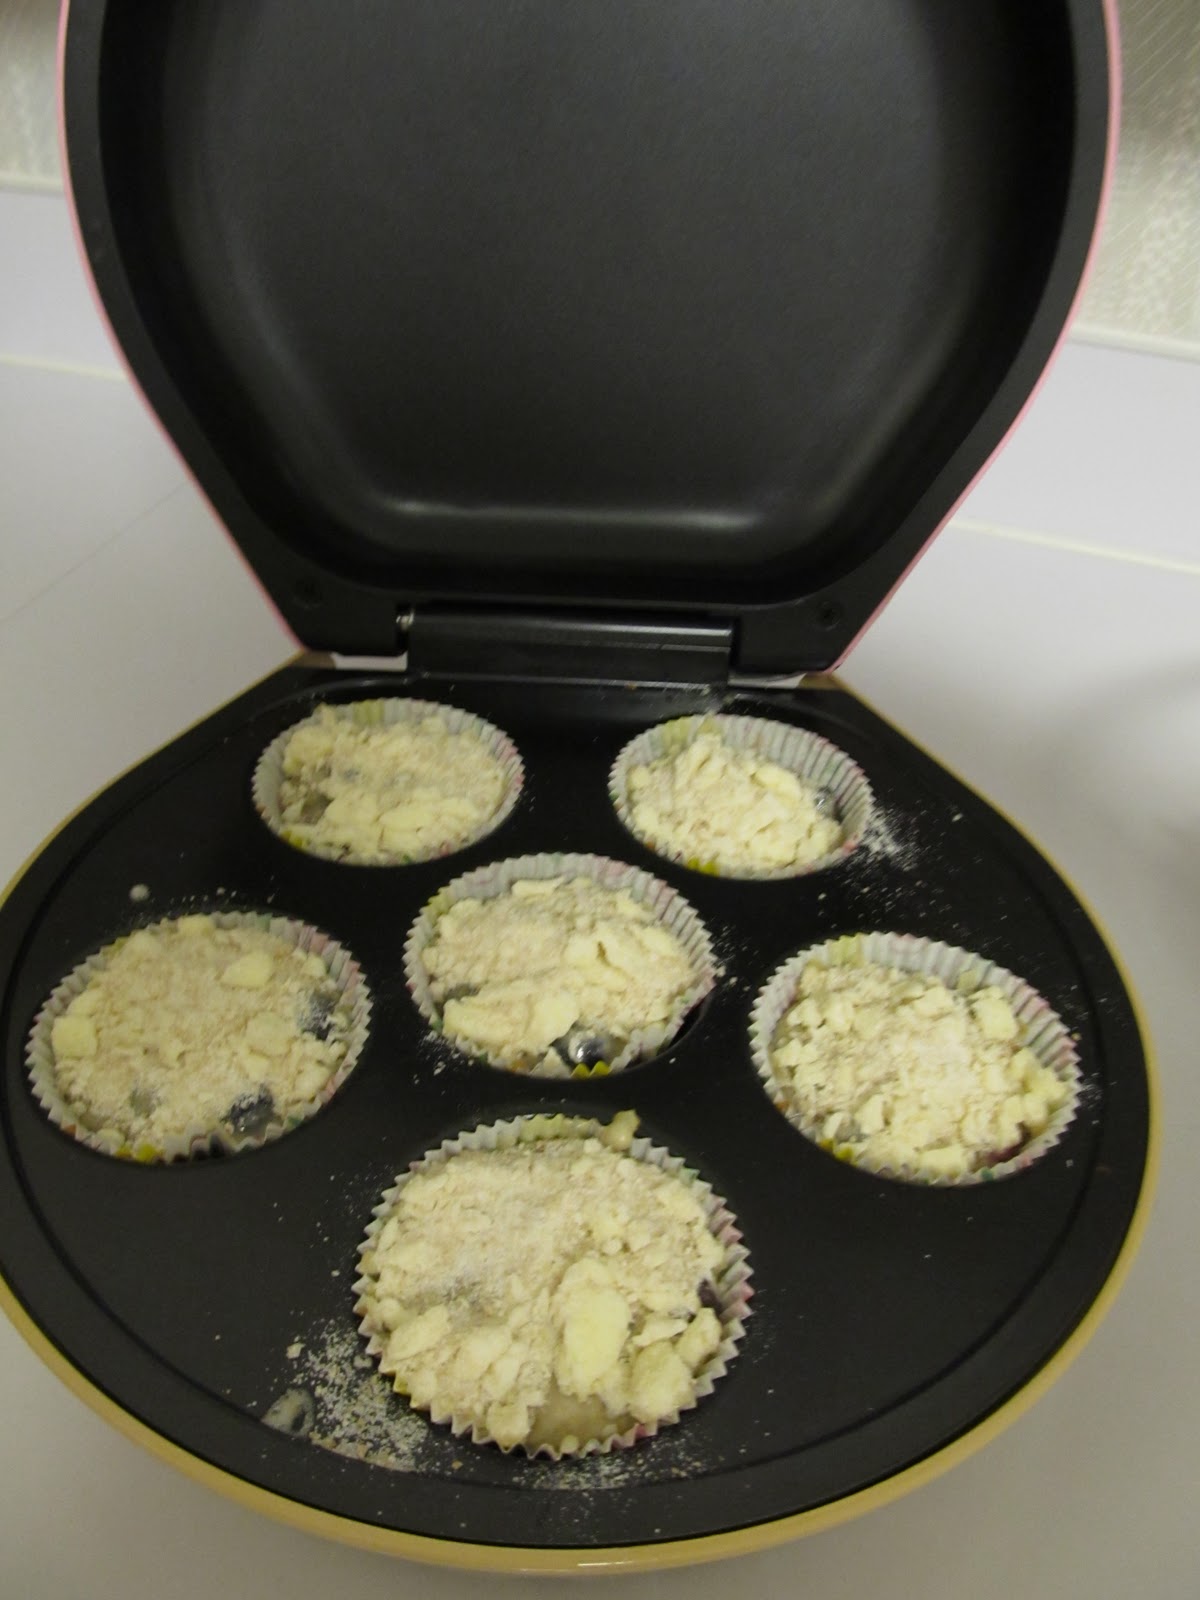
In the cupcake baker I tried one set with topping and one without.  I baked them for about 15 minutes in the cupcake baker.  If baking them in a conventional oven, I would try baking them at 350 for about 20-25 minutes or until they're golden brown.

I used half the batter for muffins and used the rest of the batter for a more conventional breakfast bread. I put the batter in the pan...

And covered it with topping.  Then I baked it at 350 for 40-45 minutes.  (So you could either halve the recipe to make this same size pan, or you could make two pans of bread - great for sharing :)

Here's what the plain muffins looked like it.  Yes, since this is Cowtown Cooking, I am shamelessly including this picture.  You're welcome :)

The ones on the left are without topping, the ones are the right are with topping.  The ones with topping may not have been super pretty, but let me tell you, warm right out of the oven?  With a cold glass of milk?  SO AWESOME!!!  Seriously, my husband and I could probably a pan each - SO good!!

Here's what the breakfast bread looked like right out of the oven.  See how pretty it is with that yummy topping crust?  You know you want to try it right through the screen!

Totally yummy!  And a word to the wise - this doesn't keep more than a day, so the sooner you eat it, the better ;)

Tuesday, October 18, 2011

Another Chocolate Peanut Butter PSA

It makes great graham cracker-chocolate peanut butter sandwiches.  Perfect for an afternoon snack.  Or breakfast.  Pick your pleasure.
Who knew CPB was so versatile?

Get ready, Cowtown Friends, tomorrow we have brisket on the menu!!

Friday, October 14, 2011

Chicken and Dumplings

This was my first attempt ever at chicken & dumplings.  I will admit I love Cracker Barrel chicken & dumplings and I wanted to see if I could make something comparable.  I found this great recipe here
and thought it would be a good starting point.  Next time I will make my own dumplings (per the recipe), but this time I already had dumplings on hand that I wanted to use.  I also added salt, garlic powder (of course!!) and pepper, to taste, to my batch at the end.  This got the Mister's stamp of approval so I believe I did good!!
For this you'll need:
  • 4 quarts chicken broth
  • about 3 cups shredded chicken (I used as much chicken as I could peel off the fryer)
  • 1 bag dumplings
  • 4 tbsp flour
  • 5 tbsp water
  • salt (to taste)
  • pepper (to taste)
  • garlic powder (to taste)


Bring broth to a boil and add dumplings.  Cook per package directions.  Mine took about 7 minutes.

Mix flour and water thoroughly in small bowl.  Pour into broth.  Add chicken.  Add salt, pepper, and garlic powder.  Mix and heat through.

Doesn't it look yummy??

**It's important to note that if you use the bagged dumplings, you need to add some salted butter at the end of this recipe (trust me on this, friends, it makes it PERFECT!).  I'd say about 2-3 tbsp depending on taste for a large batch like this.

Perfect fall comfort food!!  Seriously, so good!!  I'll let you know when I make the dumplings from scratch, it will be soon!

Wednesday, October 12, 2011

Chicken Stock 101

I wanted to do a post devoted solely to chicken broth bc I feel like I've made a cooking breakthrough and I wanted to share it with you.  I know it sounds silly, but I always thought it was too hard to make stock.  It's like the cookie dough thing, now that I realize how easy it is, I may never buy canned chicken broth again!  I made my broth on Tuesday night after dinner while we were watching our Rangers beat the Tigers.  Anywho...  
For this stock I used:
  • 1 whole fryer chicken (about 5 lbs)  - giblets removed
  • 2 celery stalks (cut in three pieces each)
  • 2 carrots (cut in three pieces each)
  • 1 onion (chopped in large pieces)
  • water

I just threw everything in the stock pot, covered it with water, brought it to a boil over medium/high heat, covered it and turned it to low, and let it simmer for about an hour.  Easy!

I tend to think that it's done when the chicken is floating.  Gross, yes, but that's how I roll.
Then took the chicken out and let it sit (and the broth, too) for 30 minutes.  

Then I strained the broth and put it into two containers, covered with foil, into the refrigerator.

The next day my first batch looked like this - gross, again, don't you think??  Yes!

But here's where you get to skim the fat off and throw it away - something I found surprisingly satisfying.  I'm a cooking nerd, what can I say?

After skimming the fat, I started to divide my stock into containers for freezing.

I got this great idea from my friend, Ashley :) I poured the chicken broth into ice cube trays to freeze and use as needed.  Each tray holds about 2 cups of broth, so it's perfect for many recipes that call for just that.  Also, if I'm making a side dish, I can just pop in a couple cubes of broth for added flavor.  I love this idea!

This is the reserve broth ready for freezing.  I kept about 2 and a half quarts out for a recipe and this was what I was going to freeze.  I figured that all in all, I made about 20 cups of chicken stock.

I covered each tray with wax paper, foil, labeled it, and into the freezer it went.  This kitchen staple will be a regular at our house starting now!

Saturday, October 8, 2011

Breakfast Tacos...for Dinner

I LOVE this meal!!  I love it because it's simple, easy, the possibilities are endless, it's super yummy, and...I didn't cook it!  Haha!  The hubby did the cooking!  Score!  (I did notice that he didn't do the clean up, as well, but Rome wasn't built in a day :)

We were in need of dinner on Saturday night and had all these ingredients so it came together nicely!  The pic shows flour tortillas, but we also had corn tortillas (leftover from the King Ranch Chicken) and I loved it with the corn tortillas!  Such a yummy change!  I plan to have these on the menu more often now that I realize how simple & easy they are.  (And bc Hubby will cook the eggs :)
For this you'll need:
  • eggs
  • milk
  • shredded cheese (we used mexican blend and cheddar)
  • green pepper, diced
  • butter
  • pepper (to taste)
  • tortillas (corn or flour)
  • your favorite salsa
  • sour cream, optional
  • guacamole, tomatoes, pico de gallo, really the possibilities are endless!!


Saute green pepper until crisp/tender in about 1 tbsp butter

Now this is the even sweeter part - the Mister took some pictures!  LOVE it!  He wanted to show the ridiculous amount of eggs I got on sale at Albertson's last week :)

And the pyrex cup that he mixed the eggs (he used NINE, no you don't have to use that many, NO we did not eat that many, it was TOO much), about 1/3 cup milk, pepper to taste and whisked it in the pyrex cup.  He then poured it in a nonstick pan that he had already coated with melted butter (1-2 tbsp).    When eggs are beginning to set, scramble them, and continue to scramble them until desired doneness.  

Add choice of cheese and stir in until melted.  Add green peppers and any other additions at this point.

Yum, yum, yummy!!

We all loaded up ours differently - I did sour cream, eggs, salsa - it was fabulous!!  We will be having these again!  Thank you, Hubby!

Saturday, October 1, 2011

Awesomely Yummy King Ranch Chicken

Let me explain this recipe.  This recipe turned into quite a journey for me.  I made King Ranch Chicken a few years ago and my husband & I were not liking the recipe.  The flavor was all off.  Bland.  Boring.  If you were ever lucky enough to have King Ranch Chicken from Celebrity Bakery, back when they were still around, I wanted it to taste like that.  A little kick, just enough, but not too much.

So I took a few years off, then found this recipe in my Southern Living Best Fall Recipes, so I thought it was time to try it again.  Now, this time the recipe had me making my own chicken broth, using a whole chicken, things I wasn't used to and thought I was crazy for attempting!!  I was cursing this recipe from the beginning, thinking "why did I think this was a good idea??!?"

Well, I'll tell you why!!  BECAUSE IT'S AWESOME!!  After I tasted the final product I thought, "Totally worth it"!  The boiling the whole chicken, making my own stock, shredding my own chicken. Totally, awesomely, worth it.  This stuff is good, friends!!  Like me, you'll thank yourself when you're done!!
For this recipe you'll need:
  • 1 tbsp butter
  •  1 medium onion, chopped
  • 1 medium sized green bell pepper, chopped
  • 1 garlic clove, pressed (I smashed and chopped mine - and used 3 cloves :)
  • 1 can cream of mushroom soup
  • 1 can cream of chicken soup
  • 2 (10 oz) cans diced tomatoes and green chiles, drained
  • 1 tsp dried oregano
  • 1 tsp ground cumin (I didn't have any cumin on hand, i.e. I forgot it the two times I went to Target this week, but it was just fine without it)
  • 1 tsp chili powder (original recipe called for Mexican style chili powder, but I used regular)
  • 3 cups grated sharp Cheddar cheese
  • 12 (6 inch) fajita size corn tortillas, cut into 1/2 inch strips

You'll also need:
  • (4 1/2 to 5 lb) whole chicken
  •  2 celery ribs, cut into 3 pieces each
  • 2 carrots, cut into 3 pieces each


Okay, this is the part that threw me for a loop.  I was not prepared for dealing with the "whole chicken".  But, I put my big girl pants on and did what I had to do.  "Remove giblets" apparently means sticking your hand in a freezing cold chicken carcass and taking out whatever you can pull out.  Yuck.  I did that.  But I didn't like it.  

I rinsed my sad little bird and put it in a stock pot (original recipe called for a Dutch Oven, but again, don't have a Dutch Oven so stock pot it was).  After bird was in the pot, I covered it with water and added my carrots and celery, brought to a boil over medium high heat; covered, and reduced heat to low.  Simmer for 50 minutes to an hour or until chicken is done.  It took me longer than an hour for mine to cook, just keep checking until it's done.  I didn't take an after picture bc I honestly thought it wasn't going to be edible.  That's the zero confidence I had in my chicken stock/chicken experiment.

But I continued to follow the directions, let it cool for 30 minutes, removed the chicken from broth, reserve 3/4 cup cooking liquid (I ended up using about 1 cup instead).  Strain any remaining liquid; reserve for another use - does anyone have any good ideas about how to store chicken broth?  Because this made a ton.  More on that later...

Okay, so I wasn't feeling super confident about my broth/chicken, but I decided to soldier on...

Melt butter in large skillet over medium heat.  Add onion, saute 6-7 minutes or until tender.  Add bell pepper and garlic, and saute 3-4 minutes.  Stir in reserved broth, soups, rotel, and spices.  Cook and stir for 8 more minutes.

Then it will look like this.  I have to admit, it was starting to smell good and I was starting to have a little bit of hope for this recipe.  Not a lot of hope, but some, nonetheless.  So I began shredding the chicken.  Whole chicken yield A. LOT. of chicken!  This was another teaching moment for me.  I bought the whole fryer chicken for 4 dollars this week.  That's a ton of chicken for 4 dollars!  Totally cheaper than buying chicken breasts or tenders or whatever!   If I can just get past the whole "this whole raw chicken grosses me out" thing, I'll be good.

Layer half of the chicken in a 13x9 baking dish - I greased mine with olive oil.

Then top chicken with half the soup mixture and a cup of cheese

Then top with half of the tortilla strips.  Repeat the layers once more, topping with one more cup of cheese.  Cover and put in 350 oven for 50 minutes... 

then uncover and bake for 10-15 minutes more.  It was smelling GOOD at this point!!  I was hoping it was as good as it smelled!!

It came out looking bubbly and yummy!  Let stand for 10 minutes before serving.

For a side, I got out a can of pinto beans, rinsed and drained them, and put them in a pan.  Then, since I had a BOATLOAD of chicken broth in the fridge, I poured some chicken stock in with the pinto beans, added some season salt, pepper, and sea salt, and presto!  Yummy side!

Totally worth every minute!!  Next time I will make this on the weekend, but be assured, I will make this again!!