Wednesday, August 31, 2011

Beef Stroganoff

This is one of the Mister's favorite dishes.  He LOVES it.  It's relatively easy to make, tastes good, and it's an excuse for me to cook with mushrooms (which I love, but no one else in the house does - I'm hoping the baby will grow up to like mushrooms so I'm not completely outnumbered, anywho...).  I found this recipe years ago from my trusty red and white Better Homes & Gardens cookbook.  Hubby has requested it ever since.  This dish also has me wishing for fall!  Fall weather, football, holidays, I do believe I am ready!!
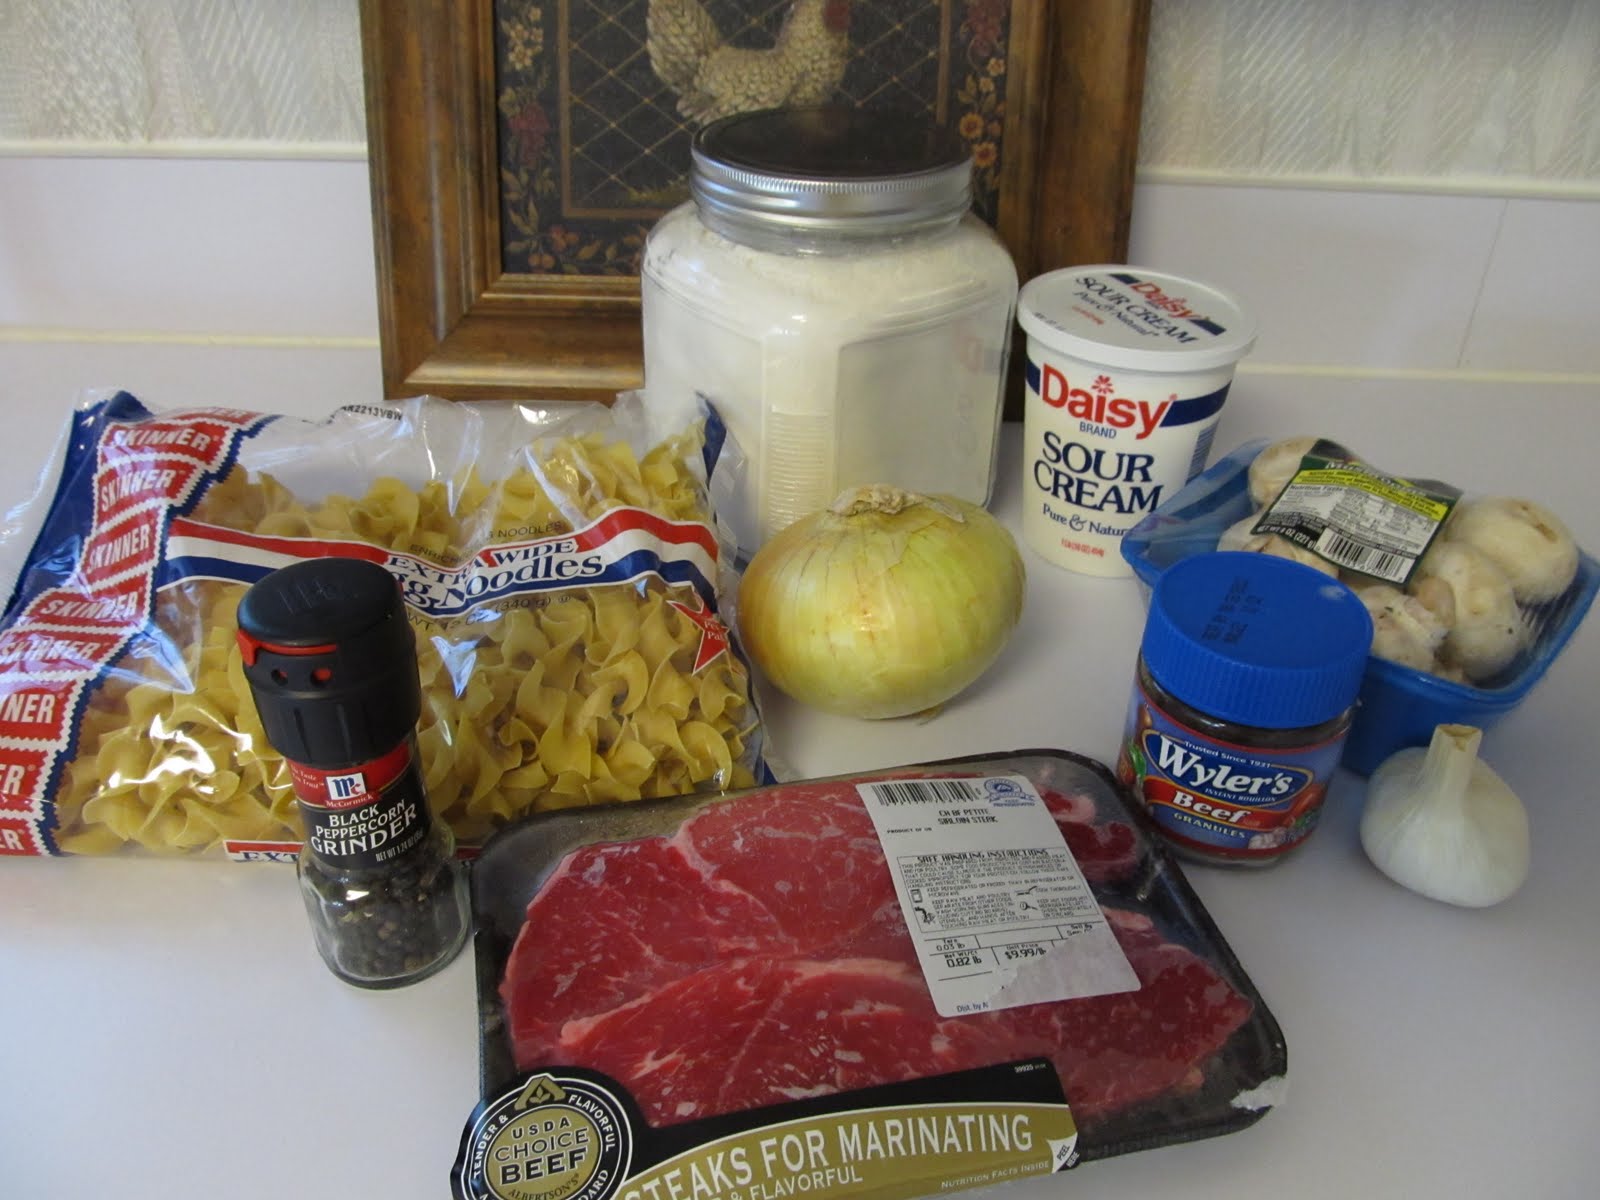
For this you'll need:
  • 1 lb boneless beef sirloin steak
  • 8 oz sour cream
  • 2 tbs flour
  • 1/2 cup water
  • 2 tsp instant beef bouillon granules
  • 1/4 tsp pepper
  • 2 tbs butter
  • 1 1/2 cups sliced fresh mushrooms
  • 1/2 cup chopped onion
  • 1 clove garlic, minced
  • 1 cups hot cooked noodles


It starts out kind of gross, but that's just the way it goes.  Mix the sour cream and flour in a small bowl


Add water, bouillon granules, and pepper.  Set aside.  Get your water starting to boil on the stove to get ready for your noodles while you make the rest of the sauce.

Here's a great tip that has helped me greatly with this recipe & others:  trim fat from meat and freeze for 30-45 minutes prior to slicing it - it makes it so much easier!  Cut the meat in bite size strips.  I also chopped my onion and sliced my mushrooms before I got started, just so everything was ready before the burner was turned on.  Notice I sliced the mushrooms big - that's so Hubby could easily pick them out and give them to me!!  Win-win!

Now, melt butter in skillet over high heat and cook half of the meat until desired doneness.  I always seem to overcook my meats, but I don't like it red so that's my justification.  Better safe than salmonella, I say - ha.

Remove meat from skillet.  Add remaining meat, mushrooms, onions, and garlic (see picture above) - this smelled SO yummy!!  Cook and stir until meat reaches desired doneness again.  I added a little extra butter here.  Then I added some water because I didn't want it to burn and I didn't want to keep adding butter because that's just crazy.

I cooked it down and drained the fat, then I returned all the meat back to the skillet.

Pour in flour mixture.  Cook and stir until thickened and bubbly.  It looks so yummy at this point you could just eat a taste out of the pan.  Because you're the cook and that makes it okay.

Drain your noodles and mix with sauce - so easy!

And so yummy!!  I love this dish!

Sunday, August 28, 2011

Apple Pork Chops with Cream Gravy

I'm so excited to share this recipe!!  I'd been thinking about putting this together for awhile, then a couple days ago Pioneer Woman made something similar so it was great to have something to start from!  I have to say, this is the first time I've ever just made up something and I was super excited that all family members ate it!  And liked it!  Bonus!!
You'll need:
  • boneless pork chops
  • 2 tbs salted butter
  • 2-3 tbs olive oil
  • 2 apples
  • 1/2 sweet onion
  • 2 tbs brown sugar
  • 1 can chicken broth
  • sea salt
  • pepper
  • **the picture shows salt, which you can season to your taste, I just didn't end up using it bc the salted butter flavored it just fine
For cream gravy, you'll need:
  • 2 tbs flour
  • 1/4 c. half and half (or milk)


Peel and dice apples, dice onion

Melt butter and add olive oil in pan over medium heat

Season pork chops with sea salt and pepper and add to the pan

Brown pork chops on both sides and remove from pan

Add onions to pan and cook to soften - oh my, this smelled so good!!  I added a little more olive oil here

Add brown sugar and mix into onions - yes, the smell got even better here!!

Add apples and mix together with the onions heat to sweet and savory perfection

Then crack open this can of fabulous flavor

And add it to your pan - the whole can

Bring it to a boil

And return the pork chops to the pot.  Cover and simmer 10-15 minutes, until pork chops are no longer pink.  I checked mine at 10 minutes and they needed a few more minutes.  Once they were cooked through, I removed the pork chops, took out the apples and onions and set them aside (I did this with a slotted spatula, it was simple, and don't worry if you don't get everything)

I put the apples and onions aside - aren't they pretty?


Then I took my remaining juices and added 2 tbs flour,


And a 1/4 c. half and half.  I probably could've added more bc my gravy was pretty thick.  If you like it thinner, just add some more to your liking.  Also, it would probably have been a little easier to mix my half and half with the flour before putting it straight in the pan.  To eliminate the bothersome clumps of flour.  I got them out but they were slightly annoying and going through the mixing step would've helped here :)

Doesn't that gravy look yummy??


I prettied it up to serve it :)

And served the pork chops with the gravy and apple mixture (shall I call it compote or salsa?) - either way it was delicious!!  I do believe I am ready for fall with this recipe!!

Saturday, August 27, 2011

Super Easy Gooey Caramel Chocolate Cake

I guess I've been craving caramel these days?!  This is one of our favorite easy recipes from Paula Deen's cookbook (or "Mrs. Paula" as my son refers to her :)  It's so easy and yummy, always a hit when we take it somewhere.  This week I made this for a church function and it was enjoyed by all!  The original recipe calls for a devil's food cake mix, but this time I used a triple chocolate cake mix - oh. my. word!! Caramel, chocolate, fudgey goodness!!  Yum!!
You'll need:
  • chocolate cake mix (+ eggs, vegetable oil, water, per package directions)
  • jar of caramel topping
  • one can sweetened condensed milk
  • Cool Whip (optional, for topping)


Here's a closeup of the mix I used - for chocolate lovers, this is a MUST!!

The only difference with this cake mix, was that it baked up a little funky because it had the fudgey swirl and extra chocolate chunks.  This cake isn't really pretty, but it's a crowd pleaser so I figure that's what's important.

Immediately after baking, pierce the top of the warm cake all over with a toothpick (I used a fork).  Pour the sweetened milk and caramel over the top.  The original recipe calls for 6 oz of caramel, but the jar is 12 oz.  So I may have used the whole jar.  I figured it would only make it better, right?  Yes.


After pouring it over, use a spatula (or back of a spoon) to spread the caramel mixture around the top of the cake.  Let cool a little more and then put it in the refrigerator to chill until ready to serve.

Like I said, this isn't a "pretty cake", but it's yummy flavor makes up for it.  Here it is right out of the refrigerator.  I sliced it up and grabbed my cool whip for serving.

It was hard to get a good picture, but see the ooey gooey goodness!!  In the original recipe, she tops it with cool whip and crunched up Skor bars, but our family likes it simple with cool whip or just straight cake!

Chocolate lovers, you are welcome!!   Yum!!

Thursday, August 25, 2011

Salted Caramel Cookies

I had been craving a cookie like this for a few weeks now - I thought, "How hard could it be??"  So I searched for a recipe and made it my own.  However, I think that I will still be tweaking this recipe bc, as it is, it's a bit messy.  BUT, it's delicious!!  Definitely worth the effort.  Salted caramel is so popular right now, and with sea salt and caramel, you can't go wrong!!
You'll need:
  • 2 1/4 c. flour
  • 1 tsp baking soda  (**note: the picture shows baking powder, but you need baking soda - I got myself together after the picture)
  • 1/2 tsp salt
  • 2 sticks softened butter
  • 3/4 c. sugar
  • 3/4 c. firmly packed brown sugar
  • 1 tsp vanilla
  • 2 eggs
  • 1 pkg chewy caramels
  • 1 pkg soft caramels
  • sea salt


Mix together dry ingredients (flour, baking soda, salt).  Set aside.

Mix together butter, sugar, brown sugar, vanilla, and eggs, until creamy.

There will still be chunks of butter at this point, that's a-okay 

Add flour mix a little at a time until you have mixed in all the flour.  This is the point where I want to start eating the batter.  But I don't.  Because I don't want to eat raw eggs.  But I do.  But I don't.  Anyway, moving on...

This is the part I will consider optional bc I don't think I'm going to include these next time I make this recipe.  I used these soft caramels, 

chopped them up into small pieces,

And added it to my batter.  It's good for that added caramel taste, but it makes for a messy cookie.  Next time I think I may add caramel sauce to the batter, or just leave the batter plain.  You'll see why in a minute.

Put small spoonfuls of batter on cookie sheet lined with parchment paper.  Sprinkle a little sea salt.


Bake at 375 for 8-10 minutes until golden brown.  As soon as you take them out of the oven, put chewy caramels on top (cut into pieces) and sprinkle with sea salt.  In the future, I think I will simply do this to add the caramel and eliminate the soft caramels.  This worked best and wasn't so messy during baking.


Here's a reality shot.  This is to illustrate the importance of smaller is better with these cookies!!  The smaller spoonfuls baked more evenly and were easier to remove from the parchment paper.  The parchment paper was super for these cookies, too, bc it was made for easy clean up with the sticky caramel.

It took a little bit of patience, 

but these cookies are worth it!!  Savory AND sweet, the perfect combination!

Let me know what you think!

Tuesday, August 23, 2011

Spaghetti with Homemade Tomato Sauce

I know all of you know how to make spaghetti.  But until a few weeks ago when I tried the Tomato Sauce with Bacon & Onion , I had not tried to make my own spaghetti sauce.  I relied on my new cookbook as a starting point and went from there.  It was pretty easy!  But I have to say, I have to tweak a few things to make it to my liking...like does anyone know how to thicken tomato sauce??  Do I add flour or....?  This sauce was super easy and very clean tasting, but I think it could've used more a little more flavor - next time I will add some basil & oregano and hopefully figure out how to make it thicker!  But besides that, it was pretty and smelled delish!  The recipe I had was for simple tomato sauce, but added meat to mine bc that's just how we like it around here.
You'll need:
  • olive oil
  • about 2 lbs of ripe tomatoes
  • 5 cloves of garlic
  • about 1 lb of ground beef
  • pepper
  • sea salt
  • garlic powder


I started by roughly chopping up my tomatoes using a serrated knife - so easy!!  My life has changed thanks to my new knives hahaha!  Sad.

Beautiful, glorious tomatoes.

And into the food processor they go.  I put in seeds and all bc I thought, "Why go through the trouble of seeding the tomatoes?  I eat them anyway on a regular basis."

I blended mine until they were at the consistency I wanted.  I was surprised that, although it's hard to tell in this picture, the tomatoes now took on a pink color, not the color of regular tomato sauce.  My nerdy cooking self thought this was interesting.

Then I poured a couple tbs of olive oil in my pan

And browned my meat - while seasoning it with salt, pepper, & garlic powder, of course!  Then I removed the meat from the pan and got out these guys...

5 cloves of garlic seems like a powerful punch, but it was just fine for this sauce.  I didn't think it was overpowering at all.  I chopped them, smushed them...

And returned him to the pan that I browned the meat in, with a little added olive oil

Then when the garlic started to sizzle, but not brown, I added the tomatoes back to the pan.

I let all that simmer, covered, for about 15 minutes

Then I added the meat back in the sauce and simmered for another 15 minutes or so - isn't it pretty?  I felt very Italian!

And if I had some garlic bread it would've been perfect!  But at least I had finely shredded parmesan & that went nicely with it.  Now once I figure out how to thicken it up, it will be perfecto!!